How to Create Consistent Characters Using Gemini Nano Banana Pro
If someone asks me which is the best image model right now, I’d say it’s Gemini Nano Banana Pro. But there’s a universal issue AI creators face: creating consistent characters.
When you’re creating comics or AI videos, you need images with the same character appearing across different scenes. The character needs to look like the same person every single time. Same face, same hair, same features, same proportions.
This sounds simple, but it’s actually one of the hardest problems in AI image generation. You can describe a character perfectly in a prompt, but getting that exact same character in the next image? That’s where most tools fall apart.
In this post, I’ll show you exactly how to solve this problem using Gemini Nano Banana Pro.
Build Your Character Foundation
The key to consistency is creating a strong reference image first. This becomes your character’s DNA. Every future image will reference this.
Here’s how to do it properly.
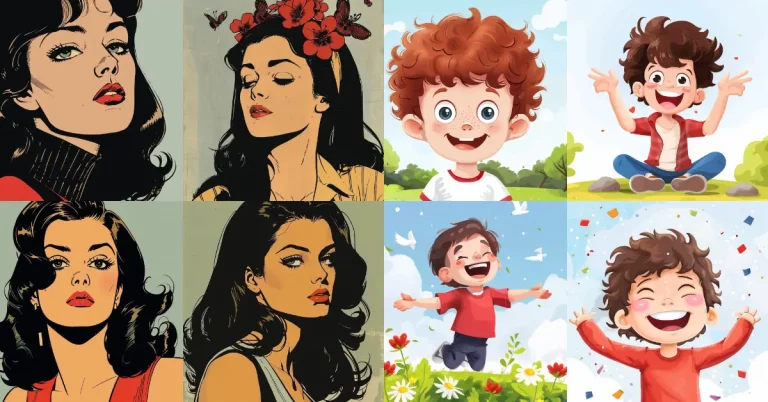
Start by using Nano Banana Pro to generate a side-by-side image. This means one image with a close-up face on the left and a full-body view on the right, both showing the same character.
Why side-by-side? Because you need both the facial details and the full body design captured in a single reference. When you upload this later, the AI can see everything about your character at once.
The Prompt Template
This is the exact template I use for every character I create. Fill in the bracketed sections with your specific details.
“Create side by side composition showing a close up portrait on the left and a full body view on the right of [character description], set in [setting or theme]. The character has [face details], [hair style and color], and [eye details]. Their skin shows [unique surface, marks, textures, or features]. Add signature design elements such as [tattoos, paint, glow, cyber markings, scars, ornaments].
On the left, the camera captures a close up portrait. Expression: [describe expression]. Eyes [describe look or focus]. Facial details clearly visible such as [pores, freckles, pigmentation, microtextures, reflections, etc].
On the right, the camera frames the full body design. Outfit: [materials, cuts, style, colors]. Accessories: [items]. Footwear and posture: [describe]. Body language should suggest [emotion or role].
Background: [describe background]. Lighting: [type of light, direction, mood], ensuring depth and realistic shadows. Overall style captured as [photography style or render quality].
Aspect ratio 4:3.”
Let me break down why each part matters.
- Character description: Be specific. Don’t just say “warrior.” Say “battle worn female warrior from an ancient mountain tribe.” The more specific you are, the more unique and memorable your character becomes.
- Face details: This is critical. Describe the bone structure, the shape of features. Sharp cheekbones, a strong jawline, a soft rounded face. These details define your character’s identity.
- Hair and eyes: Color alone isn’t enough. Describe the style, the texture, how it moves. “Braided dark copper hair tied with small bone rings” gives the AI so much more to work with than “brown hair.”
- Skin details: This is where your character becomes real. Freckles, scars, ritual markings, weathered texture. These small details make a massive difference in consistency.
- Signature design elements: Think of these as your character’s fingerprint. Unique markings, tattoos, or features that appear in every image. They’re consistency anchors.
- Expression and body language: These show personality. A firm, alert expression tells a different story than a warm smile. The AI needs this context.
- Lighting and style: Consistent lighting style helps maintain the same visual quality across all your images.
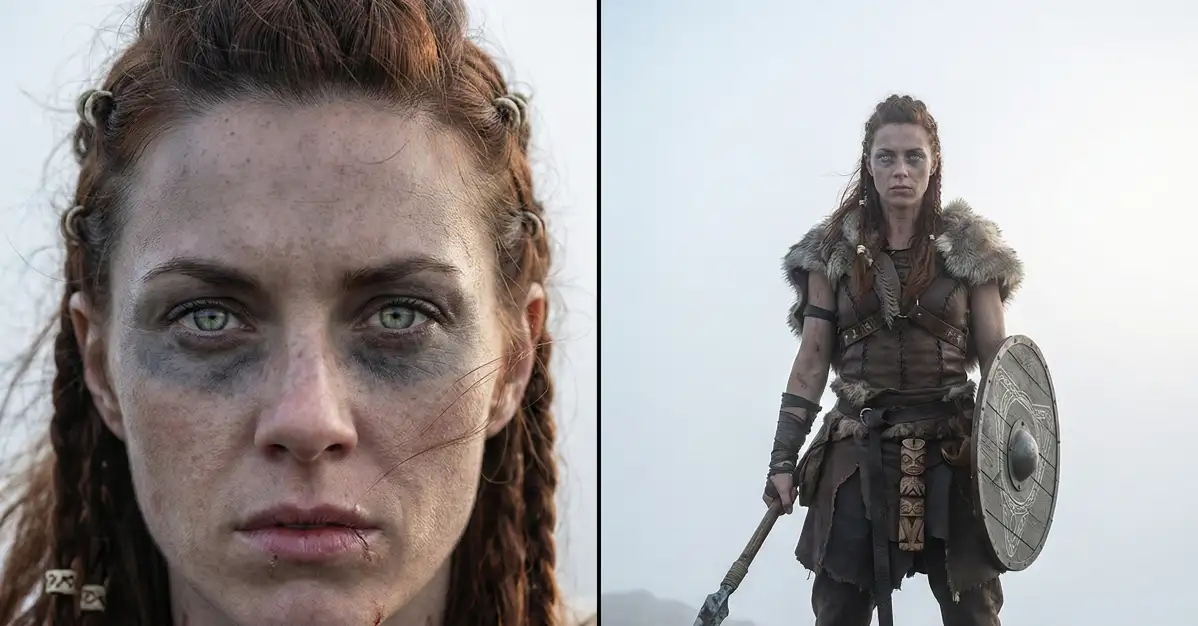
Real Example: Create a Warrior Character
Here’s a concrete example that follows this template exactly. I’ll show you the full prompt, then explain what makes it work.
“Create side by side composition showing a close up portrait on the left and a full body view on the right of a battle worn female warrior from an ancient mountain tribe, set in a cold misty highland. The character has sharp cheekbones, braided dark copper hair tied with small bone rings, and piercing pale green eyes. Her skin shows weathered tone, light freckles, and faded ritual markings drawn with natural pigments. Add signature design elements such as thin charcoal war paint under the eyes, faint red ceremonial runes across her neck and shoulders, and a small scar at the lower lip.
On the left, the camera captures a close up portrait. Expression: firm and alert. Eyes focused straight ahead as if watching an enemy from a distance. Facial details clearly visible such as fine skin texture, pores, light moisture on the lips, reflection in the eyes, and strands of hair lifting in the wind.
On the right, the camera frames the full body design. Outfit: layered leather armor with stitched segments, a fur lined shoulder mantle, weatherproof linen wraps around the arms, and a leather belt holding small carved totems. Accessories: iron wrist guards, a circular shield with engraved patterns strapped to her back, and a stone tipped spear gripped in one hand. Footwear and posture: rugged hide boots, stance steady with legs apart. Body language should suggest readiness, discipline, and resolve.
Background: bleak rocky terrain covered in pale fog. Lighting: soft diffused daylight from the front and subtle rim illumination on the edges to bring volume and depth. Overall style captured as realistic photography with crisp clarity.
Aspect ratio 4:3.”
Notice how specific this gets. The scar at the lower lip, the bone rings in the hair, the war paint pattern. These aren’t random details. They’re identifiers that will help maintain consistency later.
The outfit description is equally detailed. “Layered leather armor with stitched segments” is way better than just “armor.” The AI knows exactly what to render.
I think this level of detail is enough for most projects. But if you’re working on something important, like a full comic series or a commercial project, you might want to go further.
Generate a medium shot of the character too. This gives you a mid-range reference that shows facial features clearly while including upper body details. It’s useful for dialogue scenes or character interactions.
Also consider generating a full-body back shot. This is essential if your character has distinctive features on their back, like wing tattoos, a cape, or unique armor plating.
Test Your Reference Image
Before you move forward, look at your reference image carefully. Can you identify unique features that set this character apart? The test is simple: if you showed this image to someone and then showed them 10 similar characters, could they pick yours out?
If the answer is no, your character isn’t distinctive enough. Add more signature elements. Make the features more specific.
Apply Consistency Across Scenes
Now comes the exciting part. You’ve created your character. Now let’s put them in different situations while keeping them consistent.
The process is straightforward but powerful. Upload the character image you generated, then write prompts that place them in new scenes. The key phrase you’ll use is “featuring the same character shown in the reference image.”
This tells Nano Banana Pro to analyze your reference and maintain those exact features.
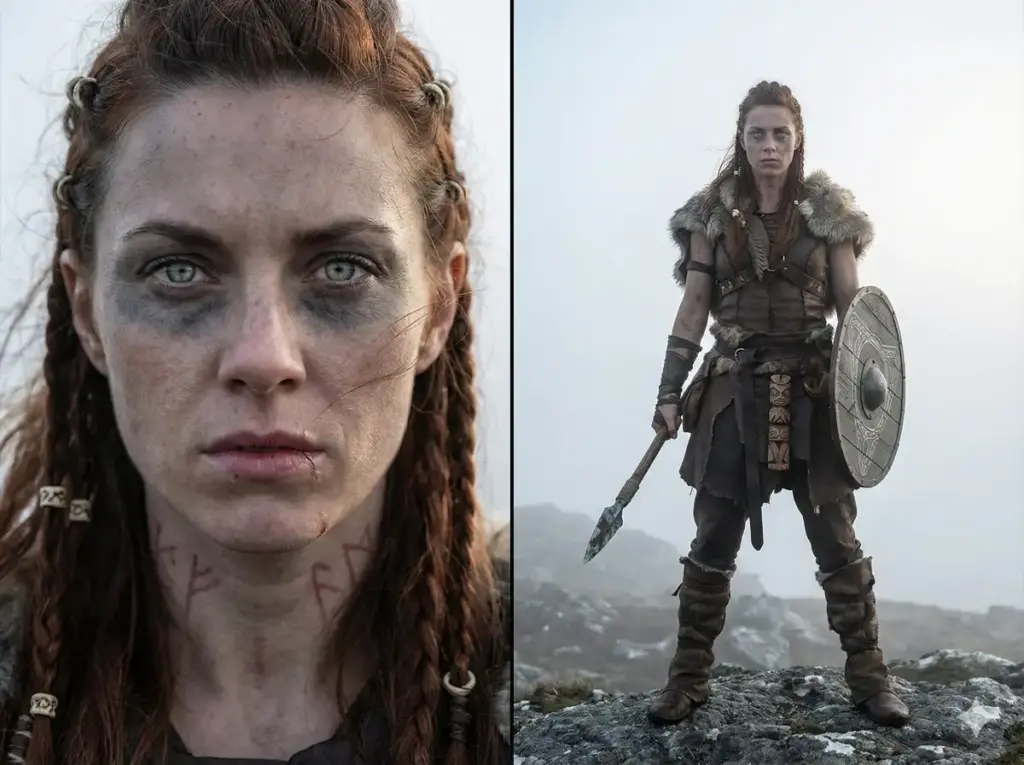
Let me show you with the warrior character. I uploaded the reference image and wanted to create an action scene. Here’s the prompt I used:
“Create an action filled war scene featuring the same character shown in the reference image. Keep all core design elements consistent.
Place the character at the center of a battlefield in the midst of a brutal mountain siege. Surroundings should show collapsed stone ramparts, burning wooden barricades, churned muddy ground, scattered broken weapons, torn banners snapping in the wind, drifting ashes, and thick smoke clouds rolling through the scene. The character is captured mid action, charging forward while raising her spear, shield lifted, posture strong and aggressive.
Lighting dramatic, shaped by firelight glow from the burning structures and diffused cold daylight from above. Show movement and atmosphere through dust trails kicked from her boots, sparks from burning wood, smoky air, flying debris, and light motion blur in the distant background.
Composition cinematic with a slightly low camera angle to amplify presence and determination. Expression fierce and unyielding, eyes narrowed toward the enemy. Keep the identity and signature design clearly recognizable from the reference, ensuring proportions, face structure, markings, outfit layers, and weapon design remain unchanged.
Aspect ratio 16:9.”
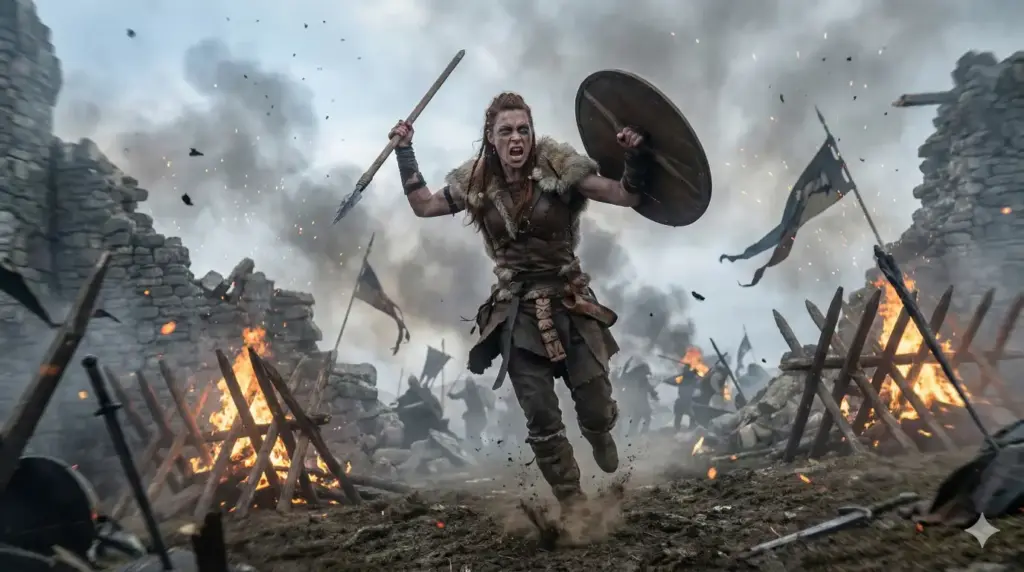
The character looks exactly like the reference. Same face structure, same copper braided hair with bone rings, same pale green eyes, same war paint pattern. Even the armor details match perfectly.
This is what consistency looks like.
Create Different Poses and Angles
One question I get all the time: how do you create the same character in completely different poses without losing consistency?
The answer is in your prompts. You need to be specific about the pose while being equally specific about maintaining the character’s identity.
Here’s an example. Let’s say I want my warrior sitting by a campfire, relaxed instead of battle-ready.
“Create a scene featuring the same character from the reference image. The warrior sits cross-legged beside a crackling campfire at night. She’s removed her shield and spear, which lean against a nearby rock. Her posture is relaxed but still carries an air of readiness.
Expression: thoughtful, gazing into the flames. The firelight illuminates her face, showing the same facial structure, pale green eyes, copper braided hair with bone rings, war paint, and the scar on her lower lip. Her layered leather armor and fur mantle are visible, with some straps loosened after a long day.
Background: dark forest surroundings barely visible in the shadows. Lighting: warm orange firelight from below and in front, with cool blue moonlight from above creating rim lighting. Atmosphere: quiet, introspective moment. Style: realistic photography with shallow depth of field.
Aspect ratio: 16:9.”
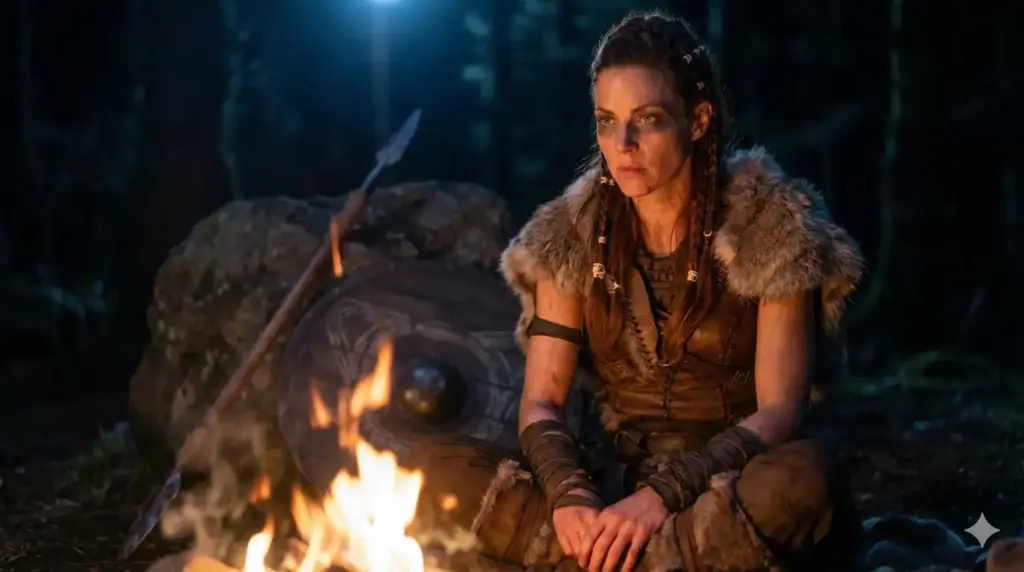
See how I listed the specific features again? Pale eyes, copper braided hair, war paint, the scar. This redundancy helps lock in consistency.
Edits and Variations
Here’s something really useful: Google Gemini Nano Banana Pro is excellent at editing photos. You can take a consistent character and modify specific elements without losing their identity.
Want to change the outfit for a formal scene? Upload the character image and ask: “Show the same character wearing elegant ceremonial robes instead of armor, keeping all facial features and markings identical.”
Want to age them? “Show the same character 20 years older, with some grey in the hair and more weathered skin, but maintaining the same facial structure and green eyes.”
Want to show emotion? “Show the same character with a genuine smile, eyes bright with joy, but keeping all identifying features consistent.”
The AI handles these modifications while preserving what makes your character unique.
Build a Character Library
Once you’ve mastered this technique, you can build an entire cast of characters. I recommend creating a reference sheet for each one.
For each character, generate:
- Side-by-side close-up and full-body (your main reference)
- Medium shot showing facial details and upper body
- Back view showing rear design elements
- A simple scene test to verify consistency works
Save all of these with clear file names. “Character_Warrior_Reference.png” is better than “IMG_1234.png.”
Keep notes on each character too. What are their signature features? What phrases work best in prompts for them? This becomes your character bible.
Advanced Technique: Character Interactions
Once you have multiple consistent characters, you might want them interacting in the same scene. This is trickier but absolutely possible.
The key is to upload multiple reference images and be very clear about which character is which in your prompt.
For example: “Create a scene with two characters. Character A from the first reference image (the warrior with copper hair) stands facing Character B from the second reference image (the merchant with the grey beard). They are negotiating in a marketplace.”
This takes practice, but Nano Banana Pro handles it surprisingly well if your references are strong and your prompt is clear.
Creating consistent characters with AI used to feel impossible. I’d generate an amazing character in one image, then never be able to recreate them accurately.
This method changed everything for me. The side-by-side reference approach, combined with detailed prompts and Nano Banana Pro’s image referencing capabilities, finally makes consistent character generation practical.
Start with one character. Create a detailed reference using the template I shared. Test it in a few different scenes. Once you see it working, you’ll understand why this is such a powerful tool for AI creators.
Your characters can finally stay consistent across every panel, every scene, every story you want to tell.