How to Create Your Professional Headshot Using Gemini
Professional headshots matter. Whether you’re updating your LinkedIn profile, building a portfolio, or creating a website, you need a clean, professional photo that makes a good first impression.
The traditional route means booking a photographer, scheduling a session, and spending anywhere from $100 to $500. That’s a lot of time and money for a single photo.
But here’s something I recently tried: Google Gemini can now turn your regular photos into professional headshots. Thanks to their new Nano Banana model, you can get quality results without leaving your home.
What You Need to Get Started
You don’t need much. Just a regular photo of yourself and access to Gemini. That’s it.
The photo doesn’t have to be perfect. A clear shot where your face is visible works fine. Think selfies, casual photos from events, or even those random pictures your friends took at dinner.
The Step-by-Step Process
Let me walk you through exactly how to do this.
Step 1: Open Gemini
Head to gemini.google.com on your browser or open the Gemini mobile app. Both work the same way.
Step 2: Start Fresh
Create a new conversation. This keeps things clean and makes it easier to compare different versions later.
Step 3: Upload Your Photo
Click the attachment button and select your photo. Again, any normal photo works. Just make sure your face is clearly visible.
Step 4: Use This Prompt
Here’s where the actual work happens. The Gemini team shared this prompt on X (formerly Twitter), and it’s been fine-tuned to give you exactly what you need for a professional headshot.
Copy and paste this:
A professional, high-resolution, profile photo, maintaining the exact facial structure, identity, and key features of the person in the input image. The subject is framed from the chest up, with ample headroom and negative space above their head, ensuring the top of their head is not cropped. The person looks directly at the camera, and the subject’s body is also directly facing the camera. They are styled for a professional photo studio shoot, wearing a smart casual blazer. The background is a solid ‘#141414’ neutral studio. Shot from a high angle with bright and airy soft, diffused studio lighting, gently illuminating the face and creating a subtle catchlight in the eyes, conveying a sense of clarity. Captured on an 85mm f/1.8 lens with a shallow depth of field, exquisite focus on the eyes, and beautiful, soft bokeh. Observe crisp detail on the fabric texture of the blazer, individual strands of hair, and natural, realistic skin texture. The atmosphere exudes confidence, professionalism, and approachability. Clean and bright cinematic color grading with subtle warmth and balanced tones, ensuring a polished and contemporary feel.
Step 5: Wait for Results
Gemini will process your photo and generate a professional headshot. It usually takes just a few seconds.
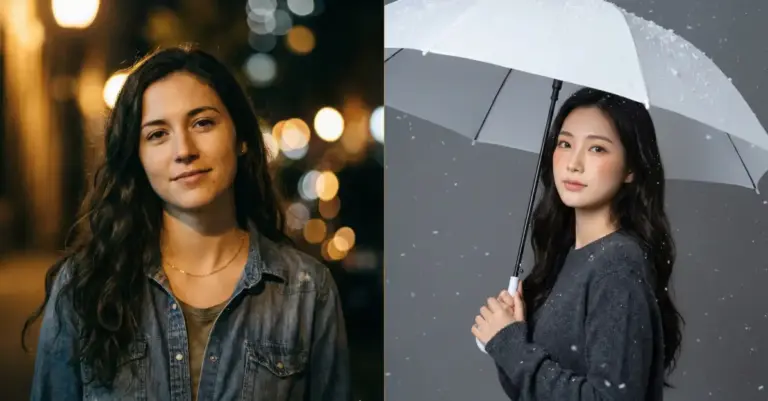
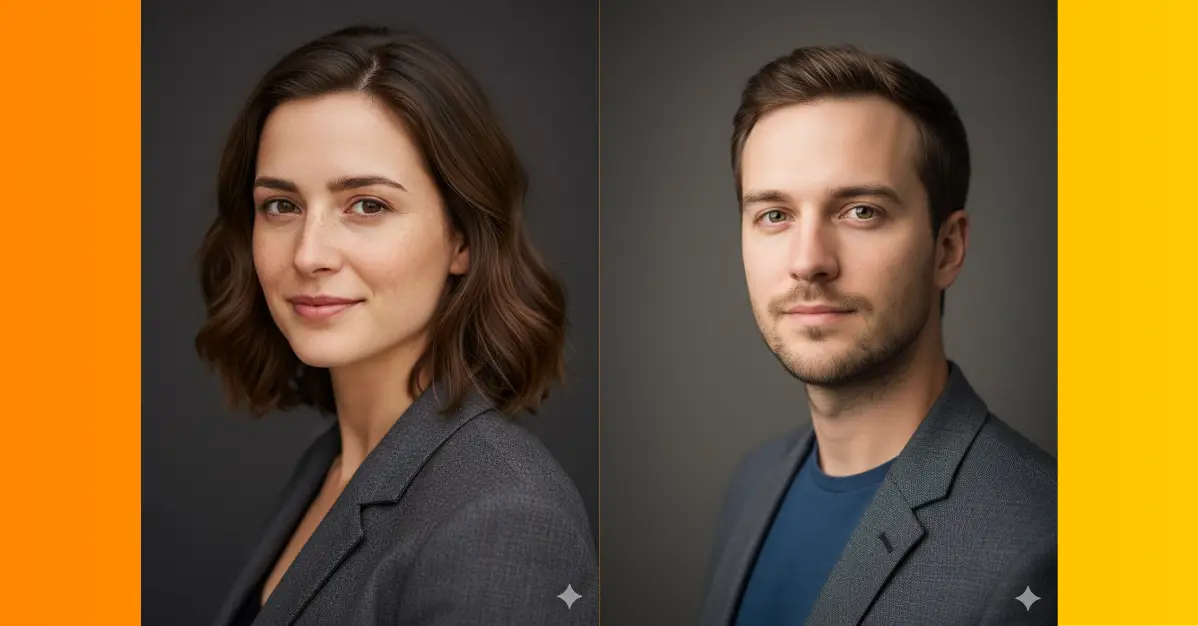
Following are some examples.


Understand the Prompt
This prompt works so well because it’s specific. Let me break down what each part does.
- “Maintaining the exact facial structure, identity, and key features” – This tells Gemini to keep you looking like you. It won’t change your face into someone else.
- “Framed from the chest up, with ample headroom” – This creates proper composition. Professional headshots need space above your head. Nobody wants a cropped forehead.
- “Looking directly at the camera” – Eye contact builds connection. This is standard for professional photos.
- “Smart casual blazer” – Blazers work for almost any professional context. They look good without being too formal.
- “Solid ‘#141414’ neutral studio background” – This dark gray color is neutral and timeless. It won’t clash with anything.
- “85mm f/1.8 lens with shallow depth of field” – This creates that professional look with a blurred background. Your face stays sharp while everything else softly fades.
- “Soft, diffused studio lighting” – This eliminates harsh shadows and creates flattering light on your face.
How to Customize This for Your Needs
The prompt is gender-neutral and works for everyone. But you might want to tweak it based on your situation.
Change the Outfit
Replace “smart casual blazer” with whatever fits your field:
- “Professional suit and tie” for corporate roles
- “Casual button-down shirt” for creative industries
- “Scrubs” for healthcare professionals
- “Polo shirt” for coaches or educators
Adjust the Background
Don’t like dark gray? Change the background color:
- “#FFFFFF” for pure white (classic corporate look)
- “#F5F5F5” for light gray (softer than white)
- “#2C3E50” for dark blue (adds a bit of color while staying professional)
- Keep it as “#141414” for that modern, sophisticated feel
Modify the Expression
Add this to the end of the prompt if you want something specific:
- “with a warm, genuine smile” for approachable roles
- “with a confident, serious expression” for executive positions
- “with a friendly, welcoming demeanor” for client-facing work
Chang the Angle
The default is a high angle shot. You can modify this:
- “Shot at eye level” for a more direct, equal feeling
- “Shot from a slightly lower angle” for a more authoritative presence
Adjust the Lighting
Want different mood? Change the lighting description:
- “Dramatic Rembrandt lighting” for artistic fields
- “Bright, even lighting” for clear, straightforward headshots
- “Natural window lighting” for a softer, more casual feel
My Personal Tips
I’ve tested this with several photos. Here’s what I learned.
Start with a photo where you’re already facing the camera. Side profiles don’t work as well.
Better lighting in your original photo means better results. Try to use photos taken during the day or in well-lit rooms.
If your first result isn’t perfect, try again with a different photo. Sometimes small changes in your input make a big difference.
Save multiple versions. Generate 3-4 different headshots and pick your favorite. They’ll all be slightly different.
Professional headshots used to be expensive and time-consuming. Now you can create them in minutes using just a regular photo and Gemini.
The google Nano Banana model does a solid job at maintaining your facial features while adding all those professional touches. The official prompt from Google’s team gives you a strong starting point, and you can customize it to fit exactly what you need.
Give it a try. Upload a photo, use the prompt, and see what you get. You might be surprised at how good the results are.